Poly Lens Quick Start Guide - PC Based Conference Rooms
For Microsoft Teams Rooms on Windows (MTRoW) and Zoom Rooms on Windows (ZRoW)
Introduction
Welcome to Poly Lens cloud. Poly Lens is a device management platform that simplifies the deployment, maintenance, and monitoring of your Poly devices while also enabling you to measure the performance of your Poly device portfolio. This quick start guide is designed to help you get going with your Poly video collaboration devices with Poly Lens in a step-by-step manner.

Deploy your Devices
Create a Poly Lens Account
To create your Poly Lens Account, see Poly Lens. You can sign up using your existing Microsoft, Google, Apple, or HP ID account. After signing up, you'll receive a welcome email with instructions. In the email, select Get Started, enter a name for your Account, and select Continue to create your Poly Lens Account. For more details, see Create an Account.
Set Up SSO
Poly Lens cloud supports the following SSO providers:
- Microsoft
- Apple
- HP ID
If you want members from your organization to sign in to Poly Lens cloud using Microsoft Single Sign On (SSO), you must allow access between Poly Lens and your M365 tenant. You’ll only need to do this once if all Poly Lens Account Members are from the same M365 tenant.
Permissions Needed for Microsoft SSO
Microsoft Single Sign On (SSO) grants permission for Poly Lens to request specific user information as part of the identity verification process. Poly Lens is federated with Microsoft, meaning Microsoft is the Identity Provider (IDP) that verifies your identity and passes that detail back to Poly Lens. To enable the SSO workflow, Poly Lens needs access to the following M365 permissions:
- Sign you in and read your profile: Allows the app to sign you in and read your profile and basic company information.
- Maintain access to data you have given access to: Allows the app to update the data without additional permissions, even when not in use.
Note: Microsoft requires specific permission levels to accept Enterprise Apps on behalf of an organization. Ensure the user signed into Poly Lens has the required Microsoft Entra user permissions to “accept” the grant. For more details, see Permissions.
Ports and Protocols
Before you proceed with next steps, ensure that the ports and protocols required for the Poly Studio apps are allowed on your network. For more details, see Ports and Protocols.
Create a Structure for Your Device Portfolio
Before you onboard your Device(s) into Poly Lens, we recommend defining a consistent and easy-to-understand naming convention for Sites, Rooms, and Devices.
Using a consistent naming convention will simplify Device management and make it easier to leverage Analytics. If your Site and Room names reflect your physical footprint, you can effortlessly drill down to any Site, Room, or Device Group of interest.
Pro Tip: There’s no “one right way” to structure your Account. However, we’ve seen the most success when an Account mirrors a company’s physical footprint. For example, if you have offices in multiple geographic regions, your Site naming convention could be:
Country Code-City Code-Building Abbreviation, for example, US-NYC-SOHO.
Create Sites
A Site is a virtual representation of an office building or Site in your organization. It can represent a single building, multiple floors, a group of buildings in the same office compound, and other sites. You can create Sites based on your business needs. In Poly Lens, a Site has many Rooms.
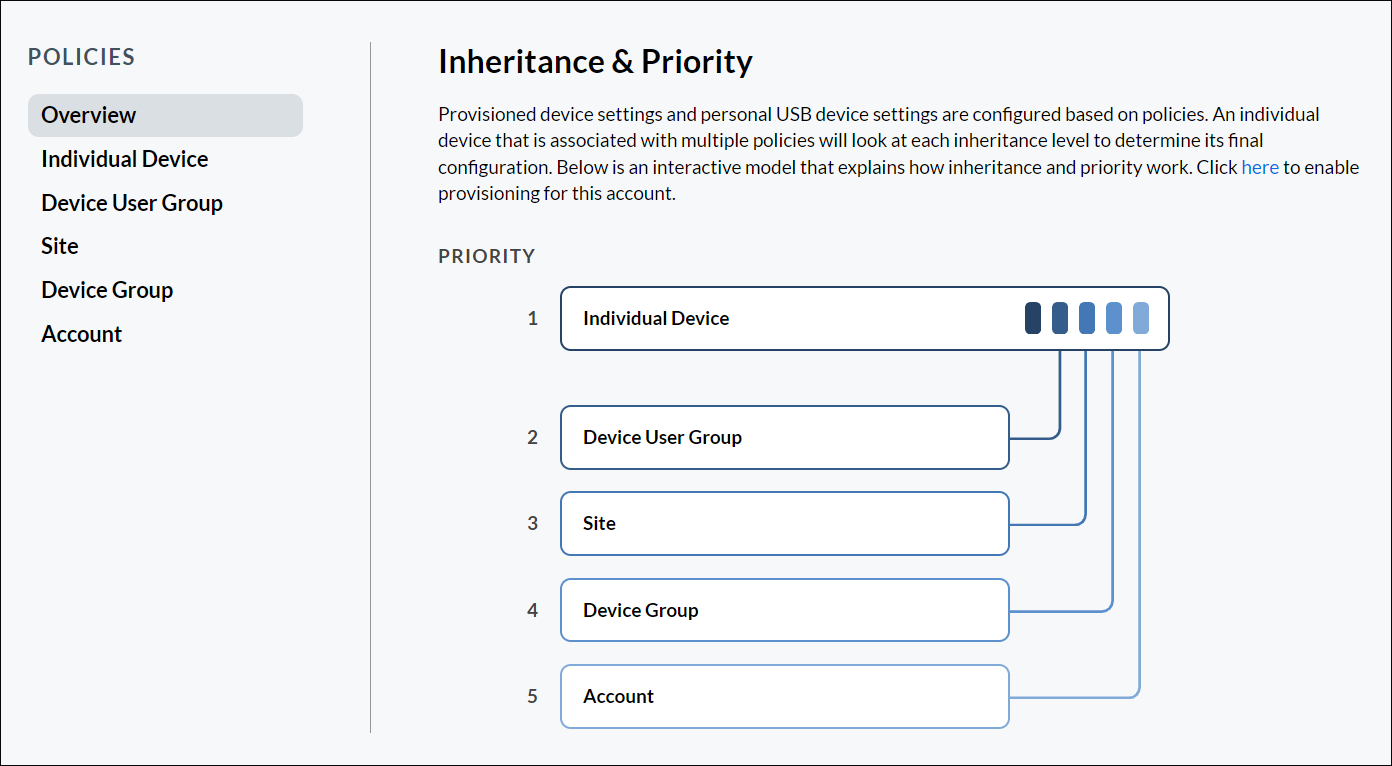
Configure Poly Lens Policies
Poly Lens Policies allow you to create and apply Device configurations across multiple layers. Each Policy type has a specific priority level, which impacts how the device inherits the configuration parameters (Settings). Settings at a Policy layer of higher priority will take precedence over Settings set at a lower priority. This means that Settings in an Account-level policy will get overruled if the same Settings are applied at the Device Group, Site, or Individual Device Policy levels.
Setting Policies for Individual Devices
Individual Device settings are configurations that apply to a single Device. Device-level settings will override those in other Policy layers. Poly Studio Room functionality allows you to set Individual Device Policies on connected Poly Audio and Video devices. Device setting changes apply in real-time, and device firmware changes apply during the Windows Maintenance Window. You can set individual Device Policies after Onboarding your device(s).
For more details, see Policy by Individual Device.
Onboard Your Devices
To onboard your PC-based conferencing room and Devices to Poly Lens, you need the Poly Studio Room app.
Poly Studio Room
The Poly Studio Room app is purpose-built to enable you to configure and manage your Poly audio and video devices in a PC-based conference room through the Poly Lens cloud. With the help of the Poly Studio Room app, you can complete the following tasks:
- View the complete Inventory of the Room (auto generated by the app)
- View Device details and online/offline status of connected Devices
- Restart the PC or attached video Devices remotely
- Manage Device settings, including for connected Devices
- Manage software updates for connected Devices with Policies
- Manage software updates between Poly Lens and Windows Update to prevent conflicts
The Poly Studio Room app can be added to your Lens account through the following methods.
- PIN Code Onboarding
- Bulk Deploy Studio Room and Onboard Multiple PC Based Conference Rooms
- Customers have the option to pre-stage the installation of Poly Studio Room using third-party tools such as Microsoft Endpoint Configuration Manager (MECM/SCCM). Poly Studio Room is available as a standard .MSI installer, similar to the HP Poly Studio Desktop app, ensuring compatibility with most deployment frameworks. For an example of deployment options, please refer to the details at HP Poly Studio Desktop - Loginless/Example Deployment Via Microsoft Endpoint Configuration Manager (MECM).
PIN Code Onboarding
Onboarding your PC-based conference room and connected Devices into Poly Lens cloud using the Poly Studio Room app is easy. All you need is to take an auto-generated Device PIN code from the Poly Studio Room app and plug it into Poly Lens cloud. Before you begin onboarding your PC room to Poly Lens, keep the following points in mind:
- Device registration requires admin-level permissions in your Poly Lens Account.
- The MTRoW or a ZRoW PC can’t be associated with pre-existing Rooms in Poly Lens.
The process of onboarding varies slightly depending on the combination of your Room PC and service provider (Teams/Zoom). Please refer to the relevant option(s) below:
- Poly Studio Base G9 Plus Kit for Microsoft Teams Rooms (MTRoW)
- Poly Studio Base G9 Kit for Zoom Rooms (ZRoW)
- Other PCs running Microsoft Teams Room or Zoom Room (MTRoW or ZRoW)
Poly Studio Base G9 Plus Kit for Microsoft Teams Rooms (MTRoW)
The kit ships with Poly Studio Room pre-installed. Onboard your system into Poly Lens by following the steps below:
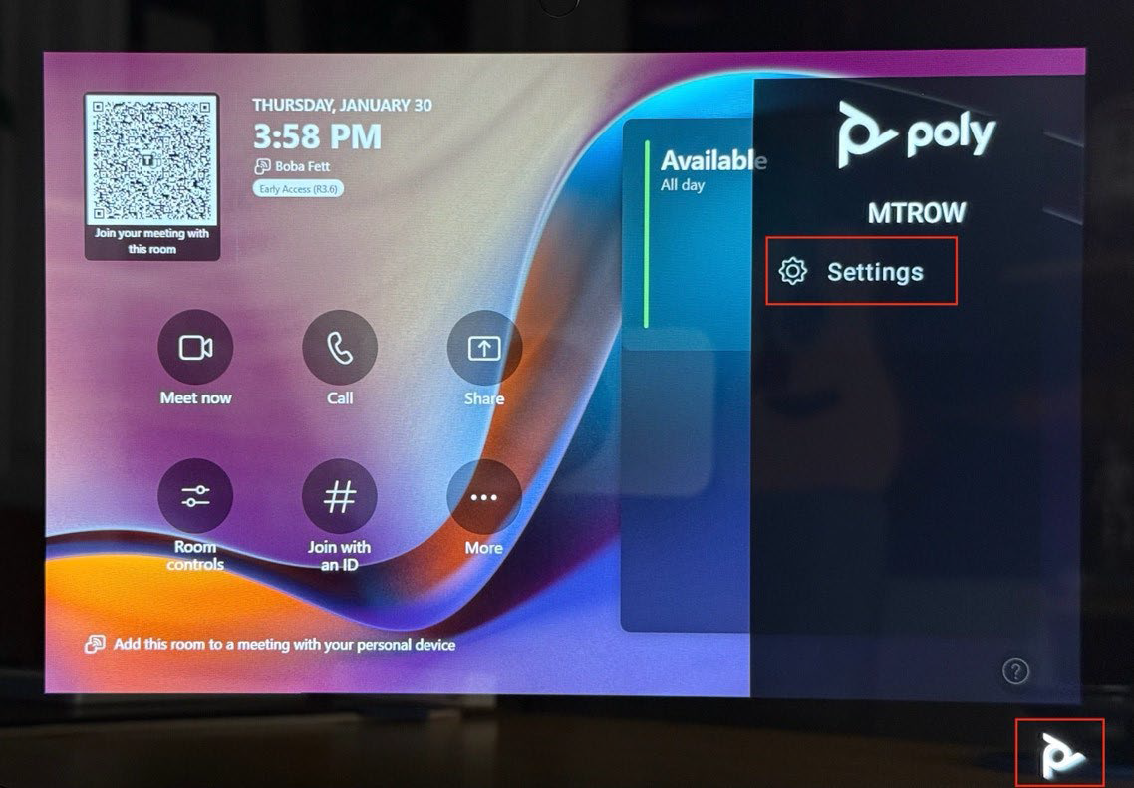
- On the TC10, tap the Poly propeller icon or swipe left from the right side of the display to access the Settings menu.
- Select Settings > Admin Settings > Enter the Admin Credentials > Poly Lens. You’ll see a QR Code, a URL and a Device PIN.
- Scan the QR Code or manually enter https://lens.poly.com/go into a browser.
- Sign in to your Poly Lens Account. After authentication, you’ll be automatically redirected to the Register Device page.
- On the Register Device page:
a. Select the Device is a PC-Based Room System checkbox.
b. Enter the Device PIN.
c. Select the correct Poly Lens Account from the Account dropdown menu.
d. Assign a Room Name.
e. Select Register Device. - At this point, a message confirming a successful registration should be displayed.
- With the PC Room created in Poly Lens cloud, navigate to Manage > Rooms, select the new Room you created, and fill in the additional Settings details.
Poly Studio Base G9 Kit for Zoom Rooms (ZRoW)
The kit ships with Poly Studio Room pre-installed. Onboard your system into Poly Lens by following the steps below:
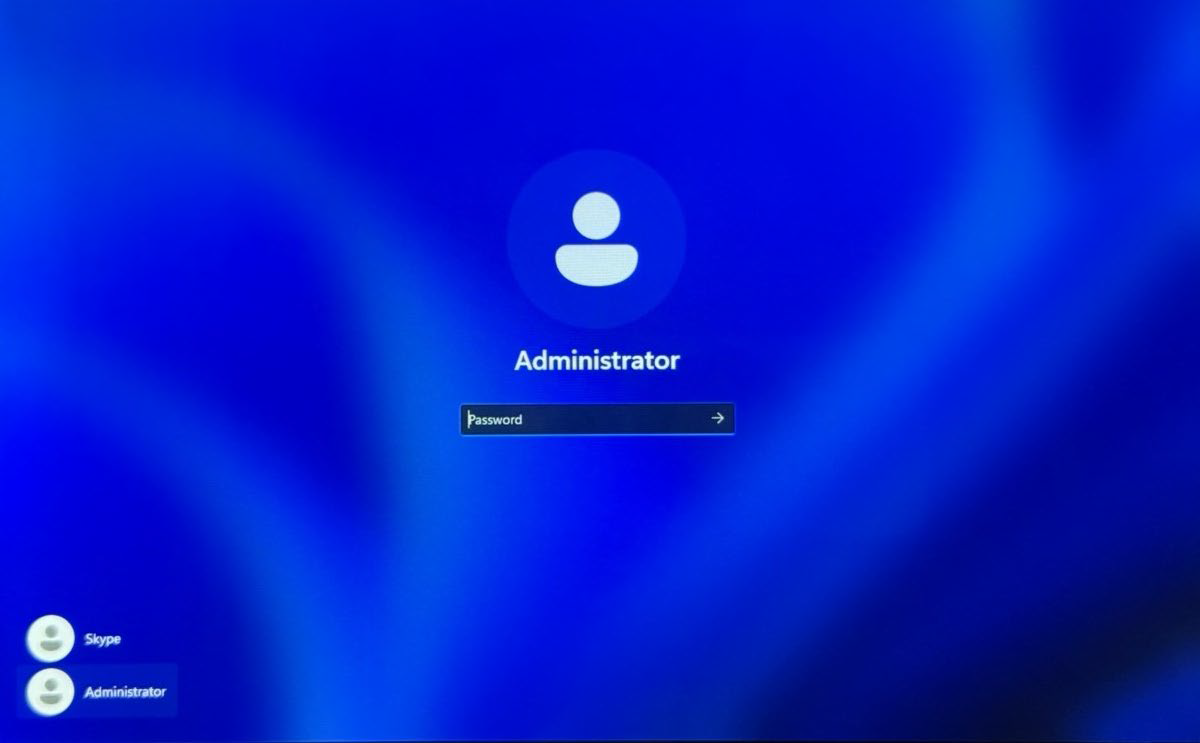
- On the Room PC, log in to the Administrator Account.
- Launch the Poly Studio Room application.
- The Poly Studio Room app opens to the setup page; Select Onboard Device with PIN to generate a PIN code.
- Copy the Device PIN to the clipboard.
- Return to the browser and log in to Poly Lens cloud.
- In Poly Lens cloud, navigate to Manage > Register Device > PIN or QR Code Onboarding > Register a Single Device.
- On the Register Device page:
a. Select the Device is a PC-Based Room System checkbox.
b. Enter the Device PIN.
c. Select the correct Poly Lens Account from the Account dropdown menu.
d. Assign a Room Name.
e. Select Register Device. - At this point, a message confirming a successful registration should be displayed.
- Confirm your Room PC and connected Devices are properly onboarded into your Poly Lens Account and then log out of Poly Lens.
- Select the start menu and switch Accounts to the Video Conferencing Provider Account for end user use.
Other PCs running Microsoft Teams Room or Zoom Room (MTRoW or ZRoW)
On PCs other than those shipped with Poly Studio Base G9 Plus/G9 kits, you need to install the Poly Studio Room app. From the Poly Studio Room app, you get the PIN code with which you can onboard your PC room into Poly Lens. Prior to starting the onboarding process, it is recommended that you review the required specifications for PCs here. Once you have confirmed that your PC meets the requirements, follow these steps:
- On the Room PC, select the Administrator account and enter the Admin Password.
- Launch a web browser, navigate to Poly Lens cloud, and log in.
- Select the Account dropdown menu and select Account Settings > App Deployment.
- Download Poly Studio Room for Windows.
- Launch the Poly Studio Room installer and start the installation.
- Follow the prompts provided by Poly Studio Room, including the selection of the Video Conferencing provider, and proceed with the standard installation path on the next screen.
- Select Launch Poly Studio Room on the final screen, then select Finish.
- Poly Studio Room opens to the Setup page.
- Select Onboard Device with PIN to generate a PIN code.
- Copy the Device PIN and switch back to the browser.
- In the Poly Lens cloud, navigate to Manage > Register Device > PIN or QR Code Onboarding > Register a Single Device.
- On the Register Device page:
a. Select the Device is a PC-Based Room System checkbox.
b. Enter the Device PIN.
c. Select the correct Poly Lens Account from the Account dropdown menu.
d. Assign a Room Name.
e. Select Register Device. - At this point, a message confirming a successful registration should be displayed.
- Confirm your Room PC and connected devices are properly onboarded into your Poly Lens Account and then log out of Poly Lens.
- Select the start menu and switch accounts to the Video Conferencing provider account for end user use.
Bulk Deploy Studio Room and Onboard Multiple PC Based Conference Rooms
For detailed information, see PC-Based Room System Devices.
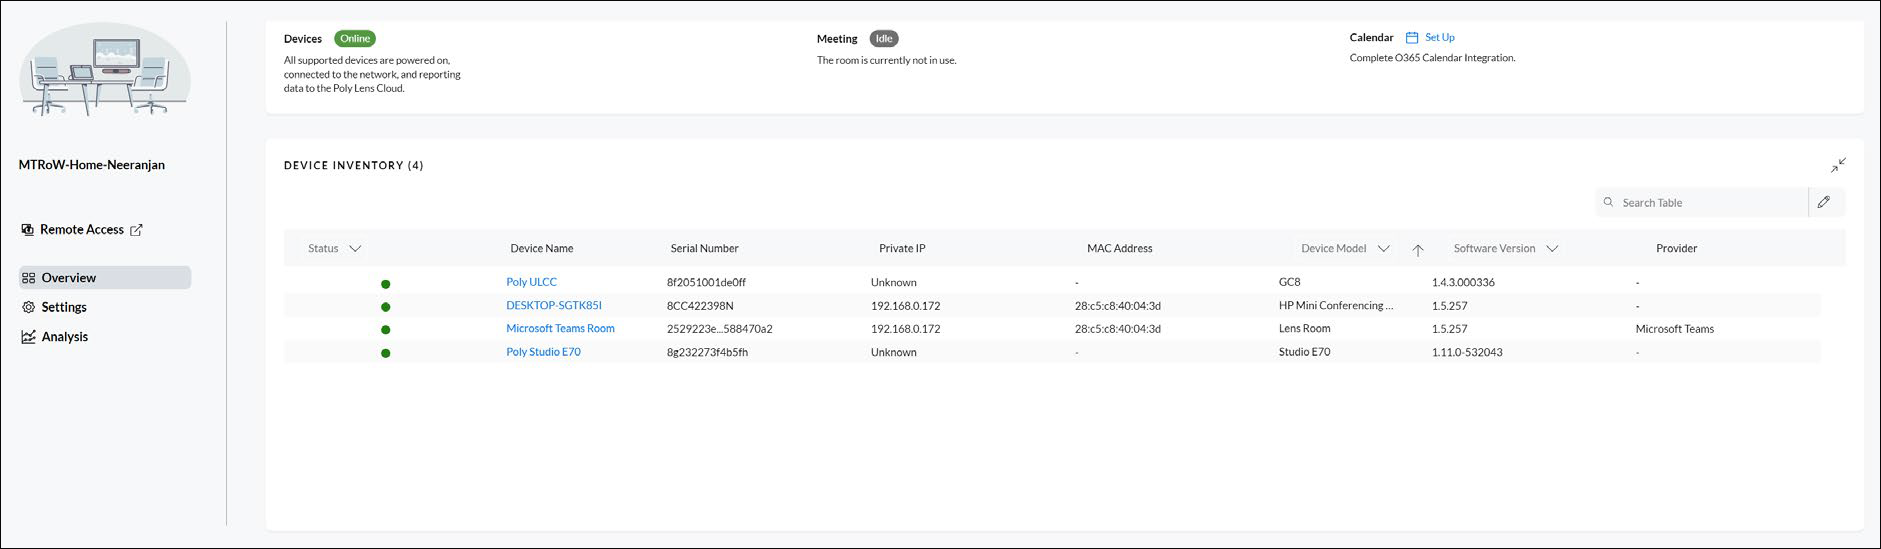
After Device Registration (Important)
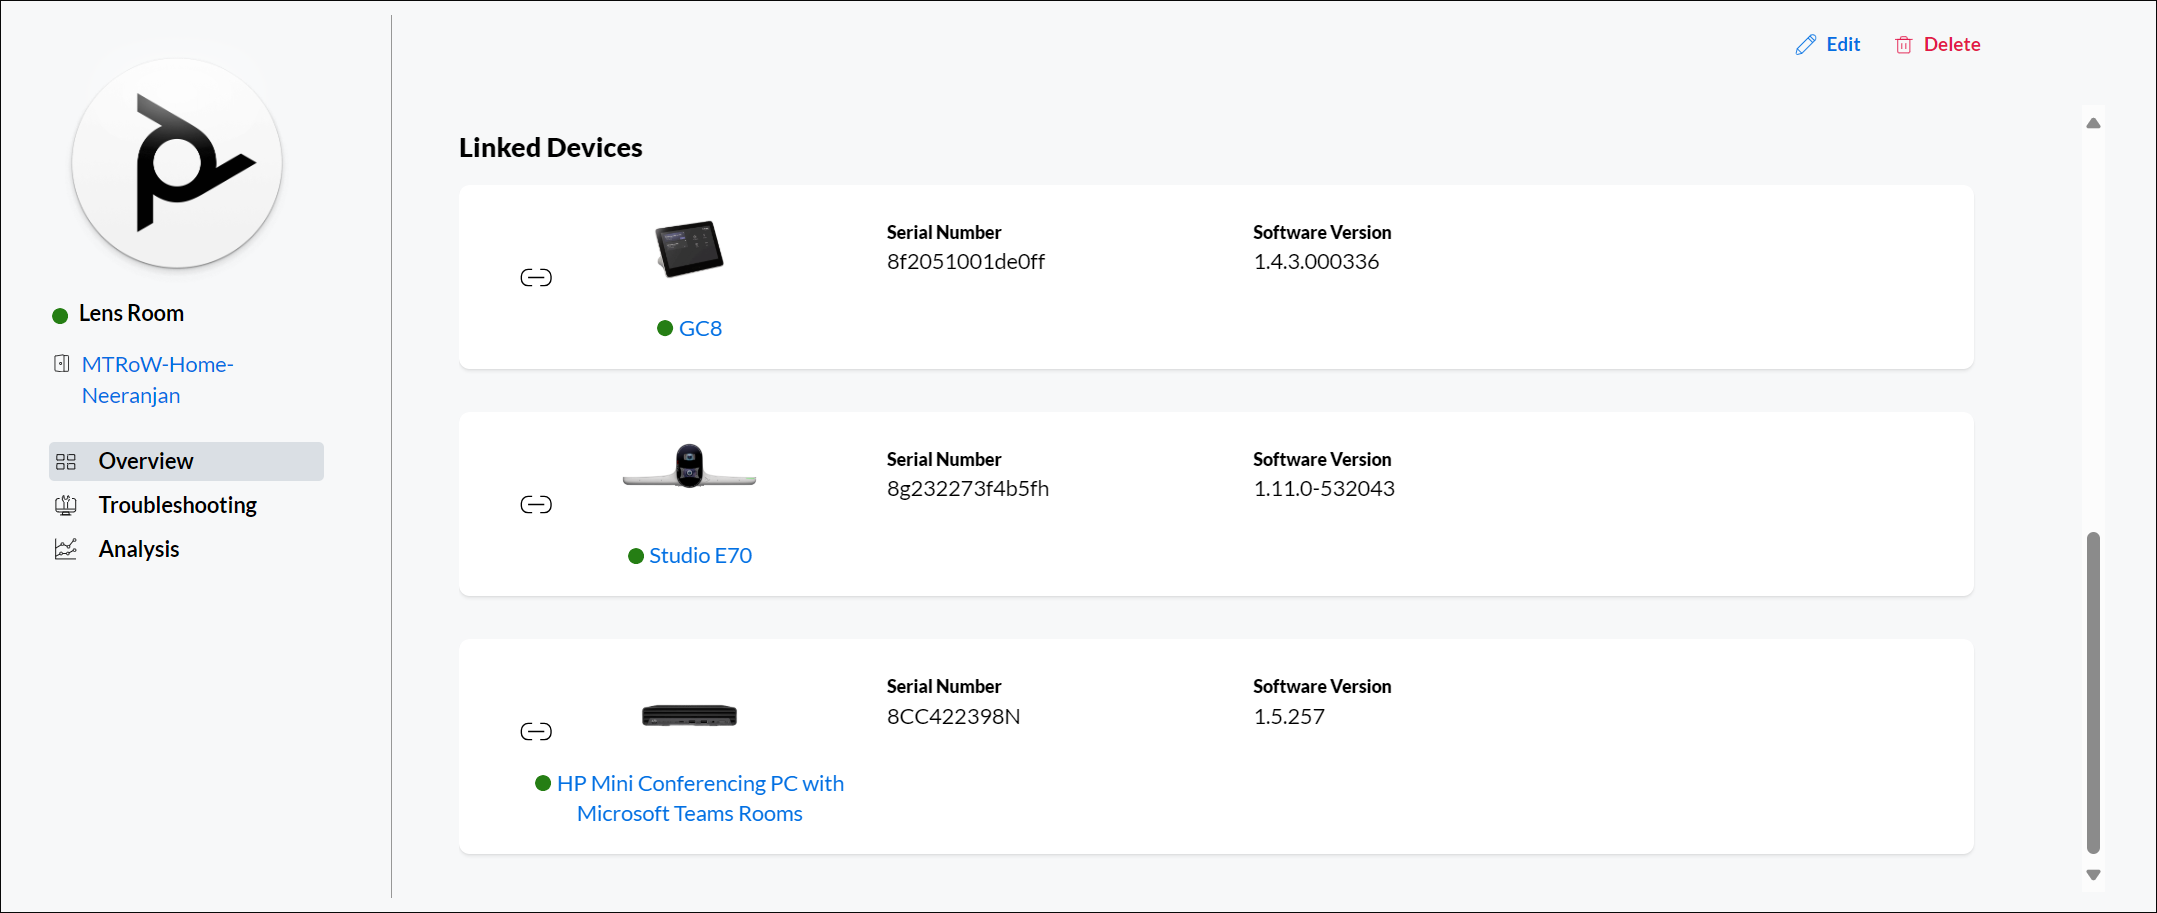
By registering your PC on Poly Lens cloud, you have created a virtual representation of the physical PC-based Room (or Space) in Poly Lens. In Poly Lens, a Room can have many Devices. The Room page on Poly Lens cloud shows all Devices connected to the PC in a single view.
Note the following information:
- Edit individual Device names from the Room view by navigating to Overview > Device Inventory > Device Name > Edit.
- Assigning a Room name is the minimum requirement for Room creation. However, within the Room’s settings, you’ll find several additional fields: Site, Room Size, Floor Name, Capacity, Calendar Resource, and Time Zone. These fields are not required to create a Room and are used for reporting and analytics. After onboarding your Poly Studio Room MTRoW or ZRoW, entering these details will save you time and provide the most accurate Room usage data.
- Each Poly Studio Room app release includes a specific TC10 firmware version which has been tested by HP Poly and Microsoft. Newer TC10 firmware versions may be released between Poly Studio Room app updates. During the Windows Maintenance Window, the Poly Studio Room app and TC10 controller automatically update to the latest published version bundled in the Poly Studio Room app. In the Lens Admin Portal on the TC10 Device Information View, you may see Update Available. This refers to the latest TC10 firmware version, not the Poly Studio Room app version on your TC10.
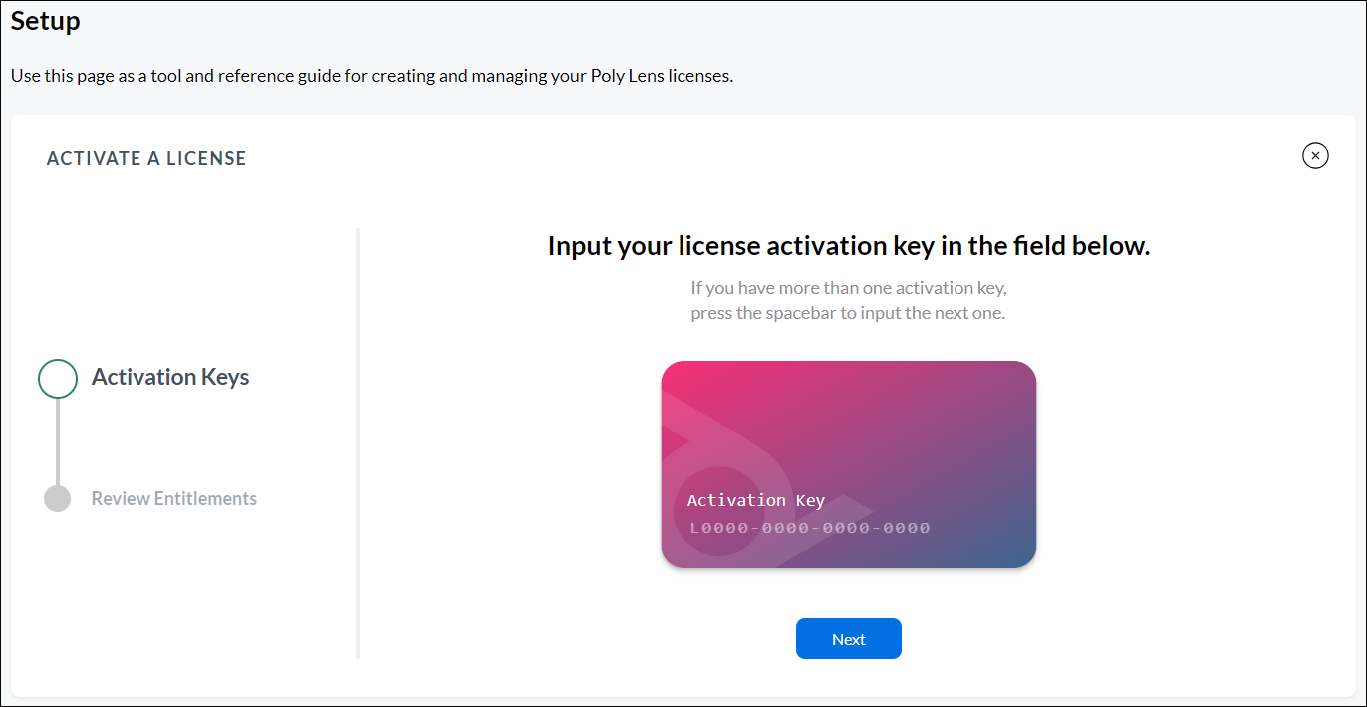
Activate Poly+ Enterprise Licenses (Optional)
Now that you’ve onboarded your Devices, you should activate your Poly+ Enterprise licenses to get the maximum benefit from Poly Lens. See Activate a License for the step-by-step process. Note: The License Keys are delivered to your inbox from noreply@sentinelcloud.com. Please check your spam folder if you don’t find the email in your inbox.
Monitor your Device Portfolio
Poly Lens has multiple time-saving features to streamline portfolio monitoring
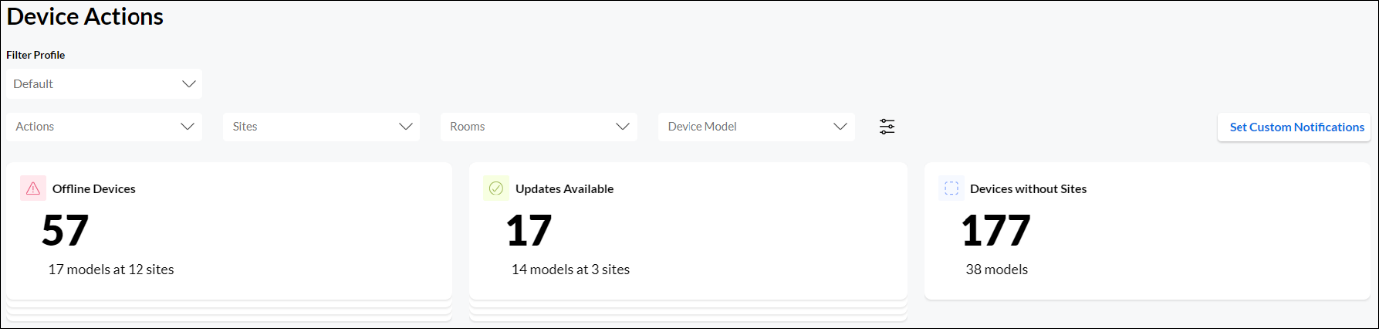
Device Actions
The Device Actions page allows you to quickly locate Devices or Sites that may require attention, for example, when a Device is Offline, or when a Software Update is available. On the Device Actions page, that information can be filtered and Devices/Sites located quickly to resolve the issue.
Maintain your Device Portfolio
You can maintain your Device portfolio at the Device, Site, or Account level.
Device Settings
On the Device Settings page, you can configure the audio/video settings of an individual Device.
Room Settings
On the Room Settings page, you can update your Room Settings such as Room name, the Site the Room is associated with, and other settings. You can see the Devices in the Room and the connected status of the Devices.
Site Settings
Site Settings allow you to view and change Site Settings such as Site name, Location, and others. You can also specify IP ranges for auto device association with the Site.
Measure the Performance of your Device Portfolio
With the above steps done, you are now ready to measure the performance of your MTRoW portfolio. Poly Lens has state-of-the-art analytics built in to help you do just that.
Insights
Poly Lens Insights provide you actionable Insights into how your Device portfolio is performing and how it is being utilized.
Dashboard
The Poly Lens Insights Dashboard provides a snapshot of your entire Inventory with a focus on Device health.

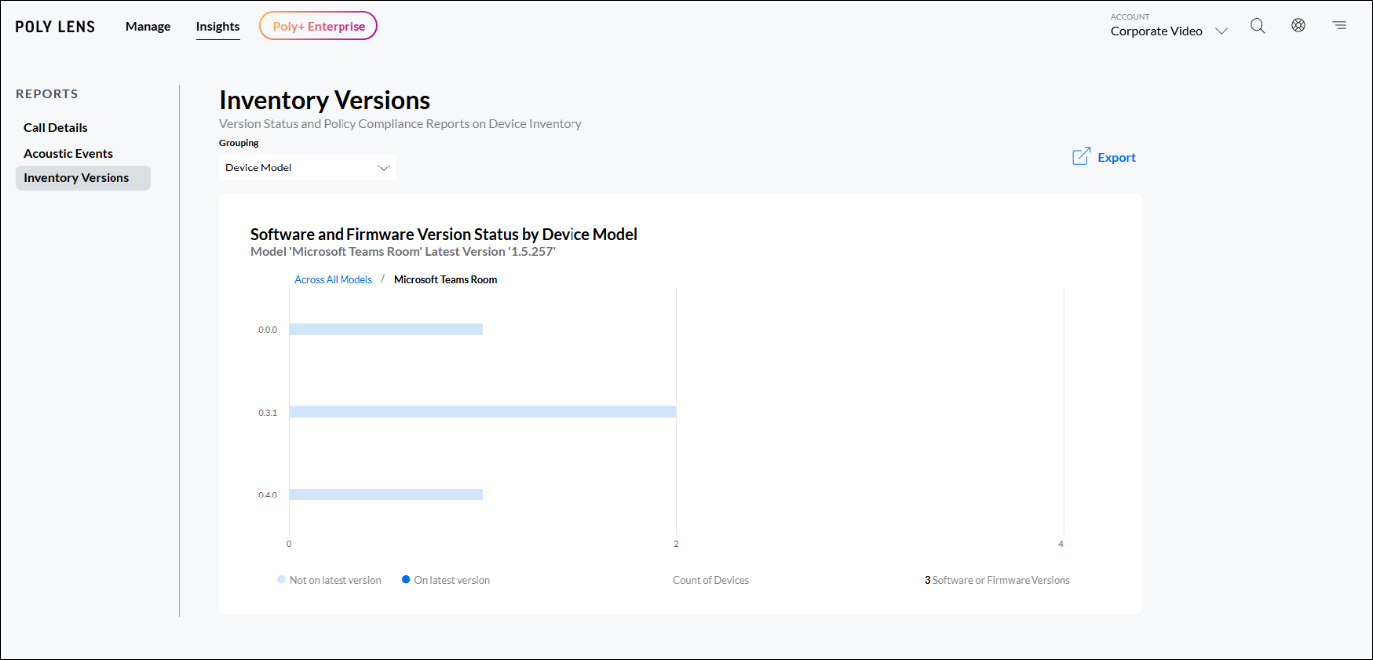
Reports
Reports are predefined, specific data sets. The Inventory Versions report is relevant for MTRoW devices. It provides a snapshot of software versions in various devices.